
Introduction
Microsoft Teams (MS Teams) is a digital hub that brings conversations, content, and apps together in one place. Educators can create collaborative classrooms, connect in professional learning communities, and communicate with school staff.
It also combines persistent workplace chat, video meetings, file storage (including collaboration on files), and application integration. The service integrates with Office 365 office suite and features extensions that can integrate with non-Microsoft products.
Microsoft PDF Guide to help you get started:
Microsoft Teams (MS Teams) is a digital hub that brings conversations, content, assignments, and apps together in one place. It can be used by professors and teaching assistants to give their lecture via an online meeting.
Within MS Teams, students can quickly converse with professors and other students, share files, create a OneNote class notebook, view their assignments and grade amongst other possibilities.
How to Get Started with Microsoft Teams
The Desktop application offers the most compatibility. (See Hardware Requirements)
Note: All active faculty, staff and students have access to MS Teams with their UOAccess ID.
You should receive a welcome e-mail, when added and/or made owner, of a Teams Classroom in your uOttawa e-mail.

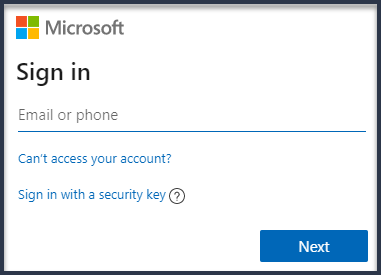
- Using the desktop application, log into MS Teams using your uoAccess ID.
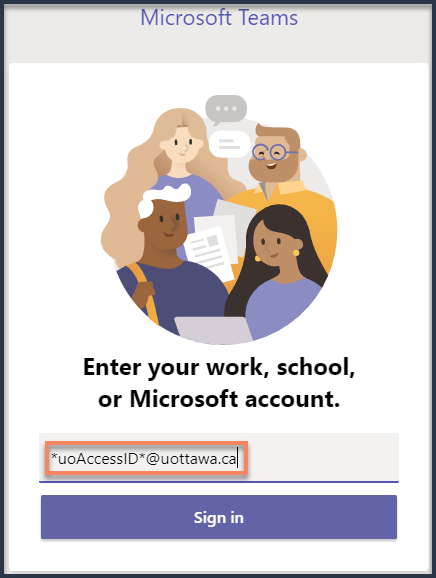
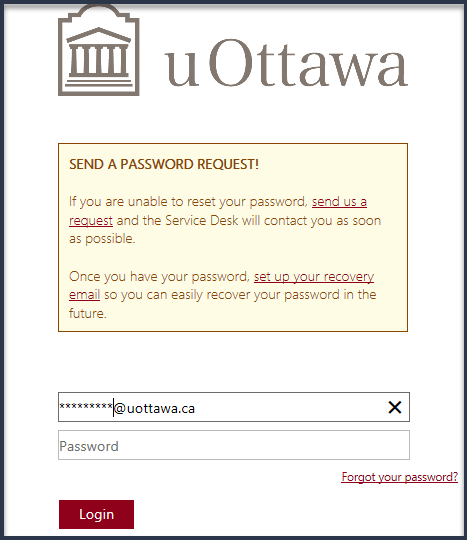
- A redirection to uOttawa website will follow, asking you to enter your password
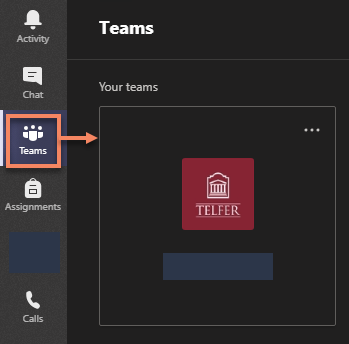
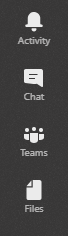
- Once logged in, on the left navigation bar, select Teams.

- Team Classrooms created for you should appear here.
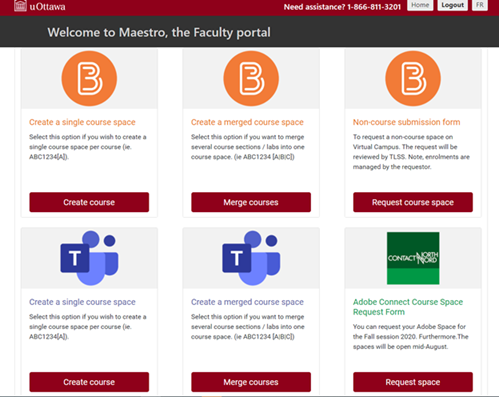
- Go to Maestro to create your MS Teams.
See: Using the Maestro Faculty portal
You should receive a welcome e-mail, when added and invited, to a class team in your uOttawa e-mail.
- Using the desktop application, log into MS Teams using your uoAccess ID.
- A redirection to uOttawa website will follow, asking you to enter your password
- Once logged in, on the left navigation bar, select Teams.
- All enrolled classes should appear here.
- If you do not see your class, please contact your professor to be added manually.
Your Team Class will be automatically filled with the list of students that was provided to IT.
It is still possible that there are last minute changes to a Class which will require Professors to manually add them to their Team Class.
Add a new member
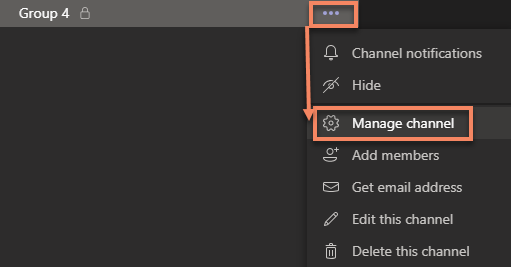
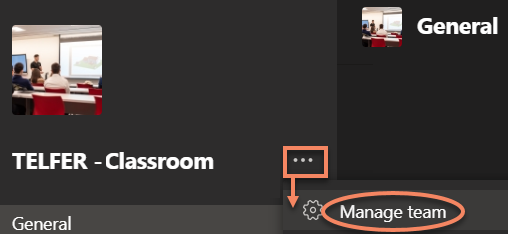
- Navigate to your Teams More options ••• › Manage Team.
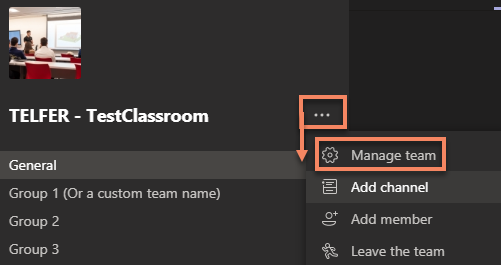
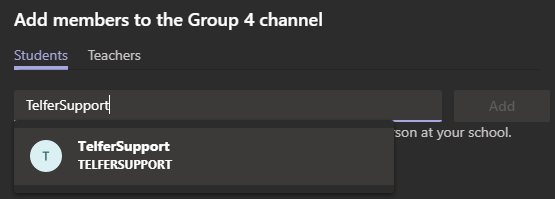
- Under Members select the Add member option on the right.
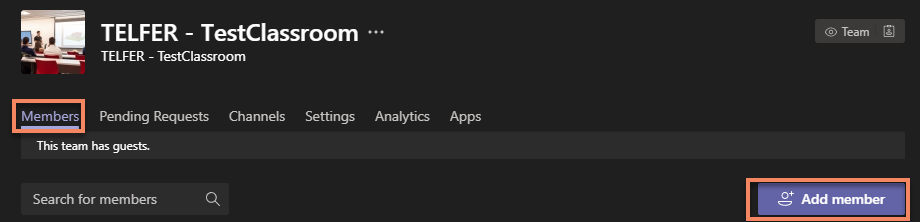
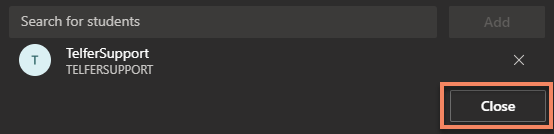
- Type a uoAccess ID in the search to add new Students (or Teachers).
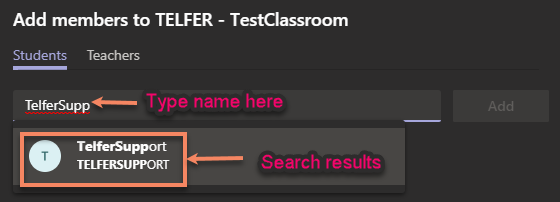 Note: uoAccess ID and uOttawa e-mail are the best way to find a user.
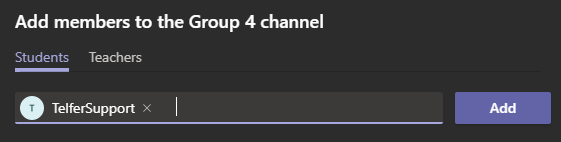
 - Select the appropriate user and Click on Add.
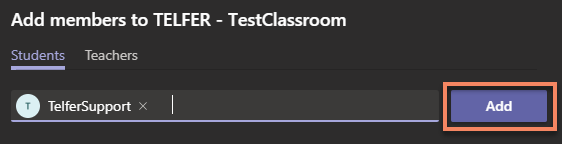
- Add other students or Click Close when done
Remove a Member
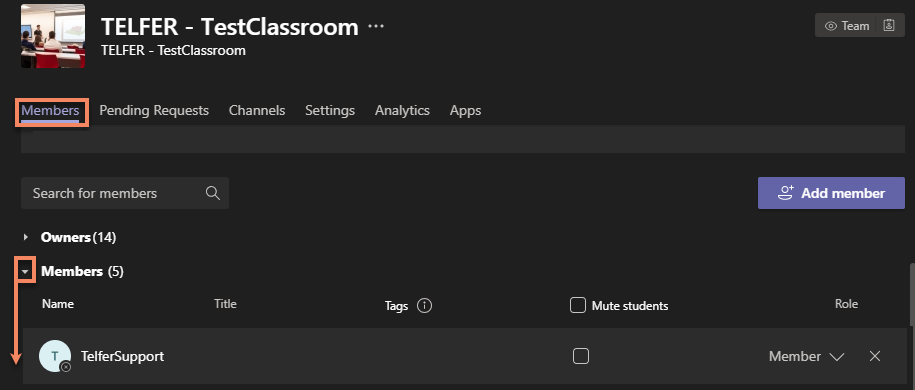
- Navigate to your Teams More options ••• › Manage Team.
- Under Members expand the section for Members and locate the specific user to remove.
 Note: If the user is an Owner, you will need to change his Role from Owner to Member before you can remove him. You cannot remove an owner otherwise.
 - Click the X in order to remove them from your Team.
 Note: There is no confirmation window. After 3-5 seconds, the name will be removed.
Promote or Demote
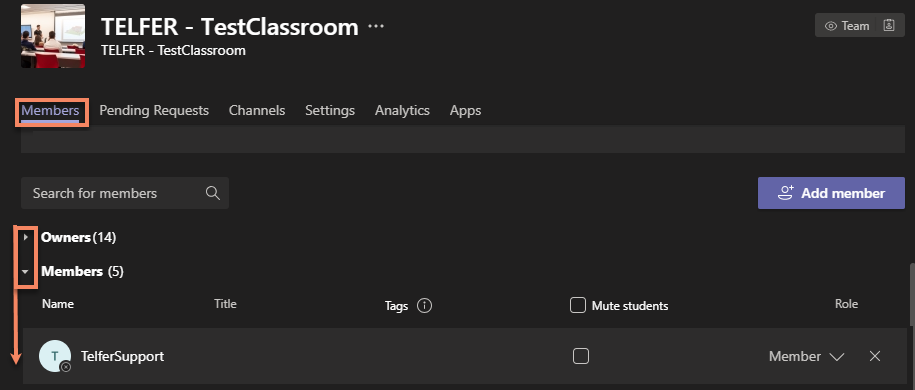
- Navigate to your Teams More options ••• › Manage Team.
- Under Members expand the section (Owners or Members) and locate the specific user to remove.
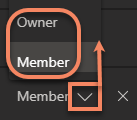
 Note: If the user is an Owner, you will need to change his Role from Owner to Member before you can remove him. You cannot remove an owner otherwise.
 - Click the down arrow and change the permission to Promote to Owner or Demote to Member.
Teaching Assistants (TA) generally have 2 accounts (a student account & an employee account). Only employee accounts will have access to the Calendar option within MS Teams in order to book meetings.
Employee Account

Student Account

Guest Account
- If you require your TA to use the Calendar function in order to book Classroom meetings on your behalf, you will need to add them as Teacher using their employee account.
- You should communicate with your TA and inform them to use their employee account to manage your Teams Class.
- Your TA will need to log in MS Teams using their employee uoAccess credentials in order to view and manage the Teams Class you added them to.
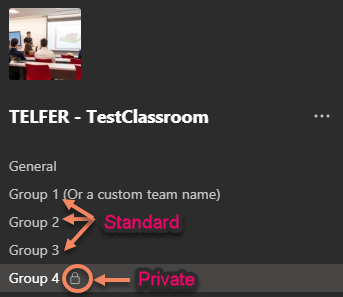
Channels and Private Channels in Microsoft Teams create focused spaces for collaboration for your students.
It is strongly recommended that you create your groups in Brightspace first and then use the groups’ list to create a Private channel in your Teams Class for each group.
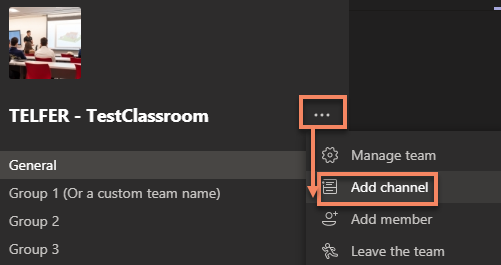
To create a channel for a team/group:
- Go to the Class team you want to create the private channel for and choose More options ••• › Add channel.
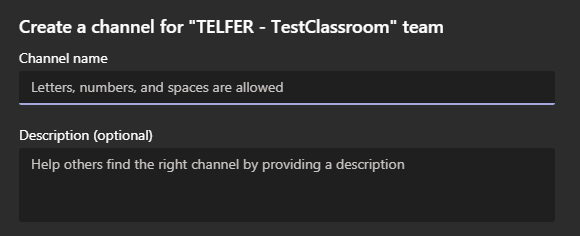
- Enter a name and description for your channel.
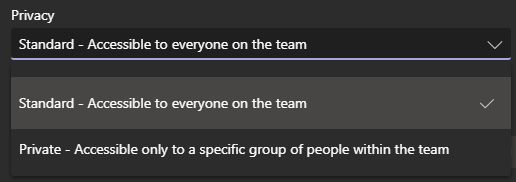
- Under Privacy, select the down arrow on the right, and then select the desired privacy. Click Next to search and add the members.
 Note: It is recommended you create Private Channels based on your created Brightspace Groups.
 - Click Add when satisfied with your settings.

- Type a uoAccess ID in the search to add new Students (or Teachers).
Note: uoAccess ID and uOttawa e-mail are the best way to find a user. - Select the appropriate user and Click on Add.
Note: Members can also be added later. See Channel Management section on Adding or removing members to a channel. - Click Close when done adding new students or teachers
- This will add a private channel to the Team.
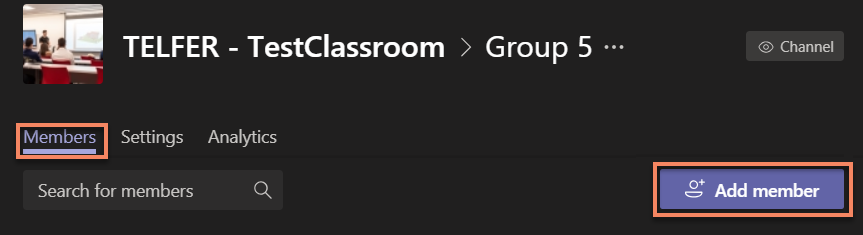
Adding Members to a Channel
- Similar to the management of your Teams Class, each channel can be managed separately by navigating to More options ••• › Manage Channel
.
- Use the Members to add or remove members to a specific channel.
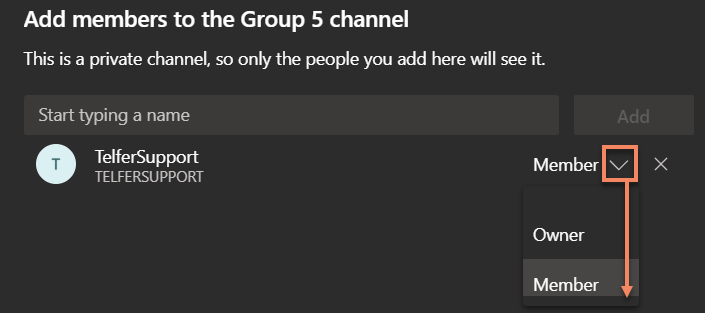
- Type a uoAccess ID in the search to add new Member.Note: uoAccess ID and uOttawa e-mail are the best way to find a user.
- (optional) Once added, you have the option to swap a Member to an Owner if needed.
Removing a Member from a Channel
- Navigate to your Teams More options ••• › Manage Channel.
- Under Members expand the section for Members and locate the specific user to remove.
 Note: If the user is an Owner, you will need to change his Role from Owner to Member before you can remove him. You cannot remove an owner otherwise.
 - Click the X in order to remove them from your Team.Note: There is no confirmation window. After 3-5 seconds, the name will be removed.
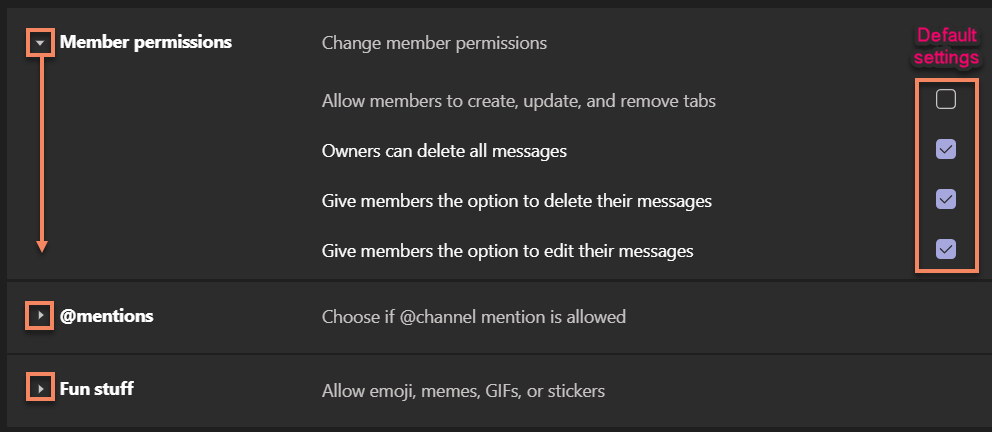
Changing your Channel settings
- Use the Settings tabs to assign roles to a specific channel.
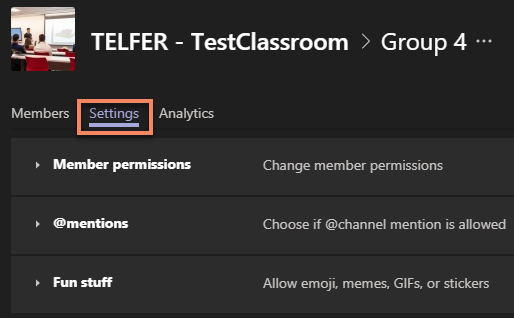
- Cycle through Member permissions, @mentions and Fun stuff and select what works best for your class environment.
Deleting a Channel
It is strongly advised you are careful when deciding to delete a channel. While Channels can be deleted, the content within them may be lost.
- To Delete a channel, navigating to that channel’s More options ••• › Delete this channel.

- A message to confirm will be displayed with warning All conversations will be deleted and this can’t be undone. Select Delete to confirm.
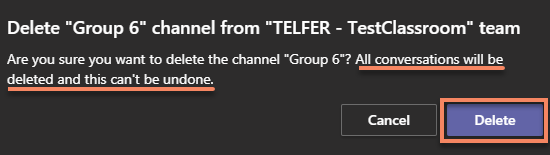 Note: It can take 5-10 seconds afterwards for the channel to remove itself from your list.
Restoring a Channel
If you try to recreate a channel with the same name, you will receive an error message. You will need to go restore the deleted channel.
- To restore a channel, navigating to that channel’s More options ••• › Delete this channel.
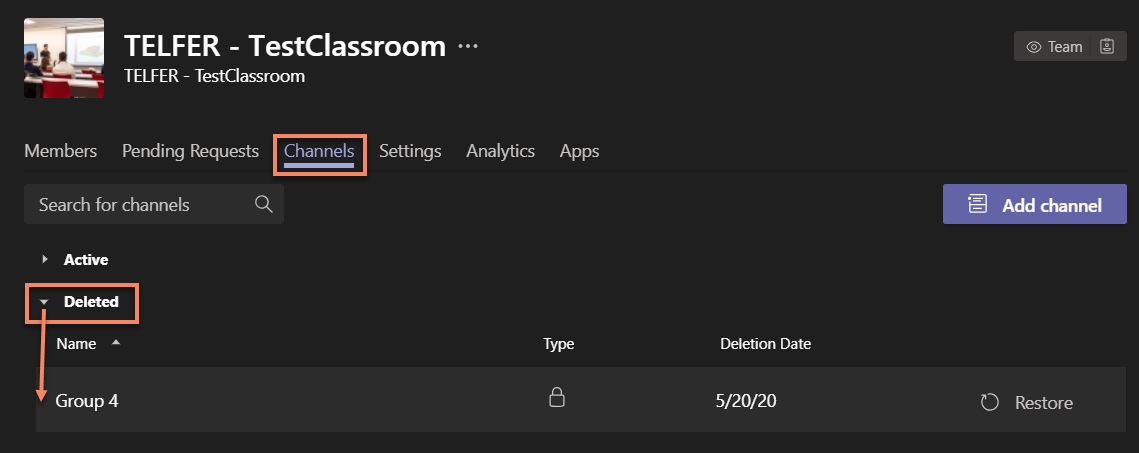 Note: It can take 5-10 seconds for the channel to remove itself from the list and appear visible in your channels.
Meetings
There are a few ways that a meeting can be created. In this section, you will learn different ways of setting up and managing a meeting created in Teams. Some options are better than others depending on your needs.
For teaching purposes and inviting your entire class, it is strongly recommended to use the Schedule a meeting in Teams.
Schedule a meeting in Microsoft Teams
- Go to Calendar
 on the left side of the app and select New meeting in the top right corner.
- You can also select a range of time in the calendar.
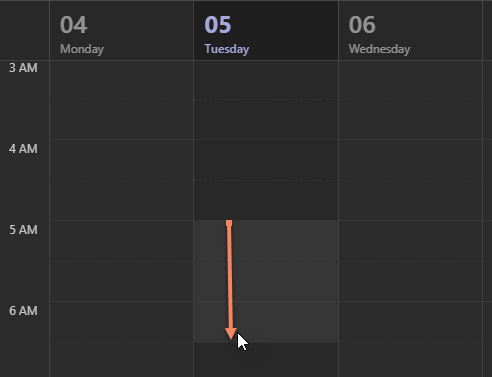
- You can also select a range of time in the calendar.
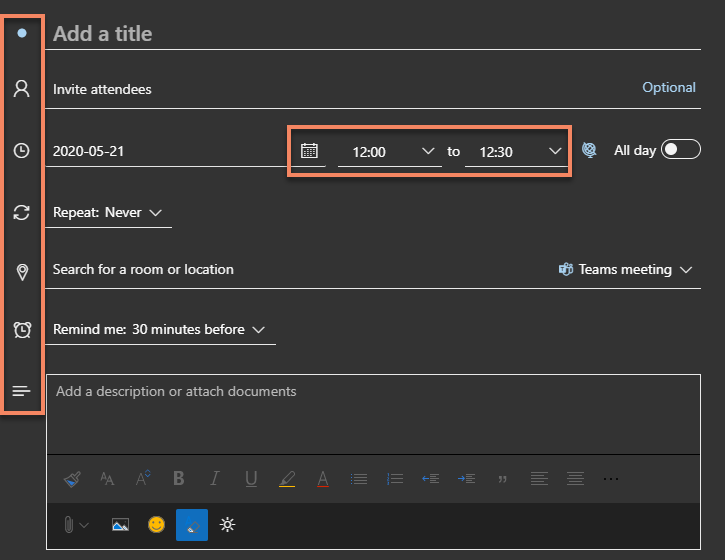
- A scheduling form will open. The scheduling form allows you to give your meeting: a title, invite your class members, and add meeting details.
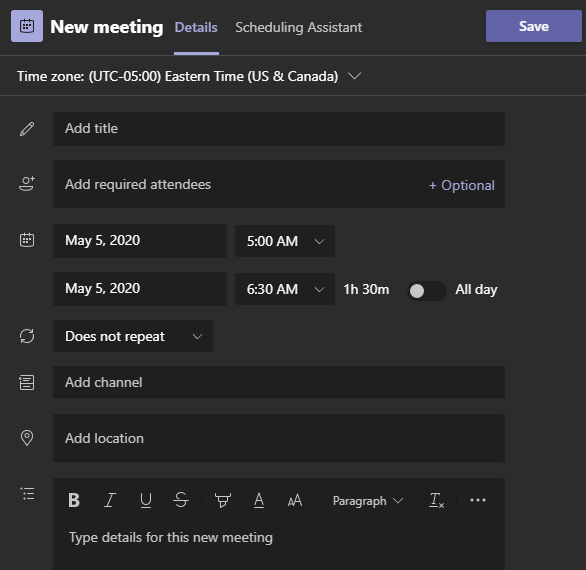
- In the field Add channel add your Class’ General channel to invite all your students to a meeting.
 Note: While this can be done with any Standard Channel to invite specific students, it is not possible using a Private Channel.
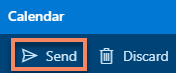
 - Once you are done filling out the details, select Save or Send. This will close the scheduling form and send an invite to everyone in your class.
Schedule a Teams meeting using Outlook
- To schedule a meeting, open Outlook.
- Switch to the calendar view.

- Click New Teams Meeting at the top of the view.
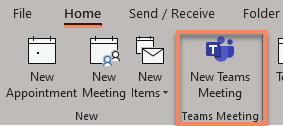 Note: Older version of Outlook may not have the Microsoft Teams Meeting extension. Please make sure Office 365 is installed on your computer.
 - Add your invitees to the Required and/or Optional field. Add your meeting subject, location, start time, and end time.
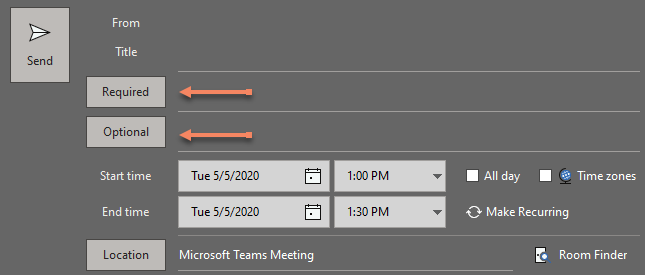
- Then click Send.
Schedule a Teams meeting using the Web
- At the bottom of the page, select to go to Calendar.

- At the top of the page, select New event.
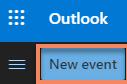
- In the window that opens, drop-down list that will let you choose Team meeting.
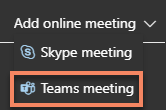
- Fill in the meeting information as needed, including meeting attendees.
- Select Send.
Start an instant meeting
For a quick meeting with a colleague, student or TA, it’s possible to start an instant meeting directly from the chat conversation window or from a channel.
- Go to Teams
 on the left side of the app. Choose the channel you want to meet in from the list.
- In the Posts or Chat tab, go to where you type new messages (at the very bottom of the app) and select Meet now
 .
.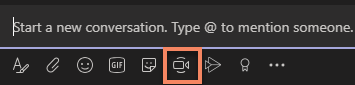
- Give your meeting a title and choose whether you want to include video.


- When you're ready, select Meet now.

Invite people to a meeting
Watch the “Meet in a channel” video (01:15 min)
See all your meetings
Watch the “Manage meetings” video (01:33 min)
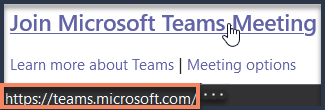
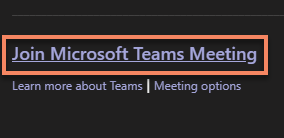
Always validate the e-mail address of the sender before clicking on any links
Your classroom meeting invite will come from your professor or “Class_Name@uottawa.onmicrosoft.com”.

All “Join Microsoft Teams Meeting” link address begins with “https://teams.microsoft.com/…”.
You may receive an invitation from a colleague to join a meeting or from others for an event. In order to avoid joining a meeting as a Guest, these steps will explain how to join a Teams Meeting.
For security purposes, it’s important to always validate the e-mail address before clicking on any links.
- In a meeting invite (Outlook or MS Teams Calendar), select Join Microsoft Teams Meeting.
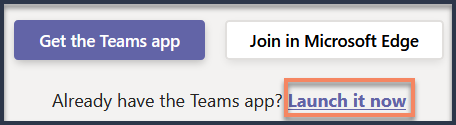
- Select one of the supported methods to open the application
- Launch it now to open the application and proceed with a secure sign in.
- (Alternative pop-up window) Under Launch application select Microsoft Teams and Open link.
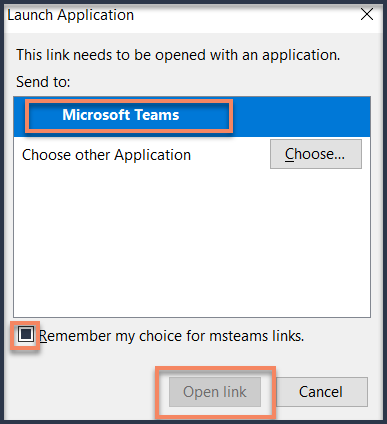 Note: You can check the box Remember my choice for msteams links to skip this window next time.
- Launch it now to open the application and proceed with a secure sign in.
- If you have never signed in the application before, Log in with your uoAccess credentials. See Access your Team Class above for a step by step guide.
- Choose the audio and Video settings you want

- Select Join Now to enter the meeting.

Watch the “Join a Team meeting” video (01:31 min)
- In a meeting invite, select Join Microsoft Teams Meeting.
- Select one of the supported methods to open the application
- Launch it now to open the application and proceed with a secure sign in.
- (Alternative pop-up window) Under Launch application select Microsoft Teams and Open link.Note: You can check the box Remember my choice or msteams links to skip this window next time.
- Launch it now to open the application and proceed with a secure sign in.
- If you have never signed in the application before, Log in with your uoAccess credentials. See Access your Team Class above for a step by step guide.
- Choose the audio and video settings you want. (Some of these settings may be set by the Professor by default.)
- Select Join Now to enter the meeting.
Watch the “Join a Team meeting” video (01:31 min)
During a meeting, moving your cursor on the screen will bring up the meeting controls toolbar.
Some of the most used options will be explained in detail below.
Meeting control toolbar:
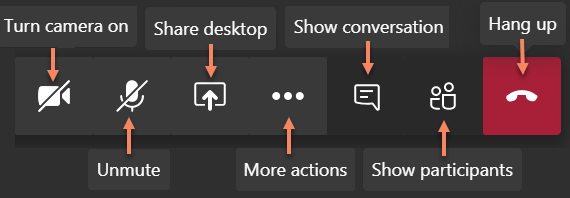
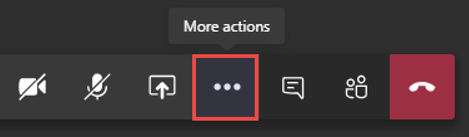
More Actions:

Manage audio settings
- Click on More actions ••• and select Show Device Settings.
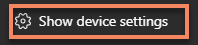
- Check and change your Device Settings by desired Audio Device, Speaker, Microphone and Camera.
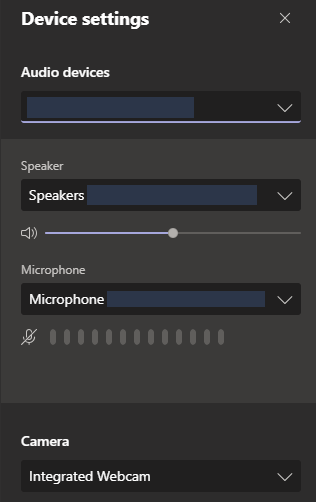 Note: If your device is not found, best practice is to reconnect your device and see if it appears.
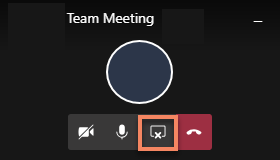
Share your screen
- To share your screen in a meeting, select Share
 in your meeting controls.
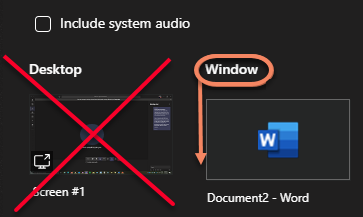
- Then, choose to present your entire desktop, a window, PowerPoint, a specific application or the whiteboard.
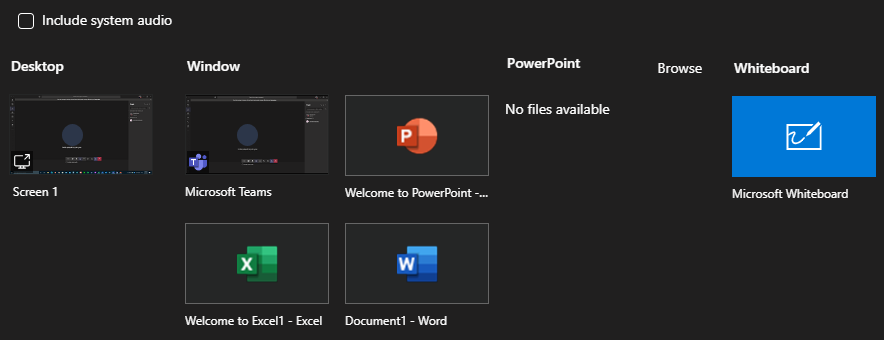
- Best practice is to simply share the Window that you require them to see, such as Word, Excel or perhaps a specific Internet window. Sharing your entire Desktop is not recommended as students would be able to see everything you can normally see on your screen. (personal files, pictures, links, notifications, e-mails, etc.)
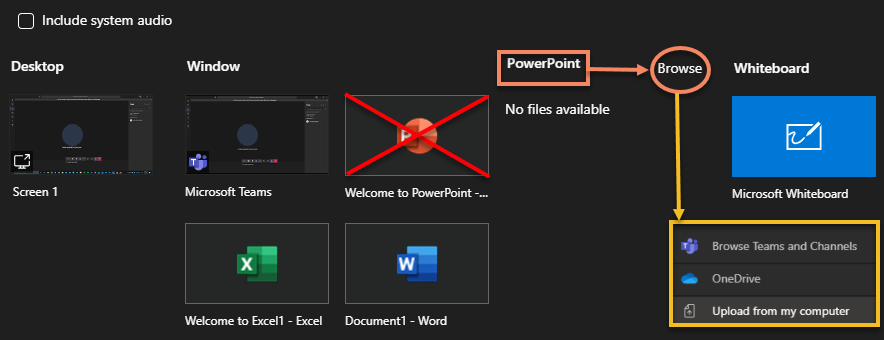
- PowerPoint has its own sharing option. This allows you to open a PowerPoint in Presentation mode, within MS Teams and see the student chat. Simply Select PowerPoint > Browse and select where your file is stored.
- If you wish to share a specific Window (ex: Word, Excel, etc.) and still wish to see the chat interface, please see section Best Practices and Troubleshooting > Share a Window and see chat.
- (Optional) Share system audio
- To share your system audio, select Share in your meeting controls and then Include system audio.
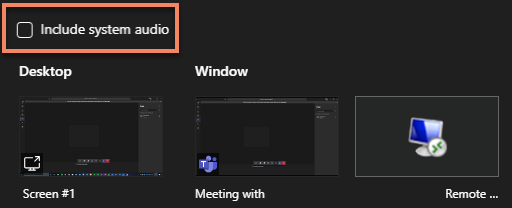 Note: All system audio, including notifications, will be included in the meeting.
- To share your system audio, select Share
- When you are done sharing, go to your meeting controls and select Stop sharing button.
 Note: Closing the shared “Window” will automatically cancel the share. Like Shutting down your PC will cancel a “Desktop” share.
 - When done with your meeting, press the Hang Up button to drop from the meeting.
 Note: Meeting organizers can End the Meeting for everyone by selecting More options ••• › End meeting.
Chat with your students
- Click on “Show Conversation” to bring up the chat interface.

- The Chat pullout menu will appear on the right-hand side of the screen.
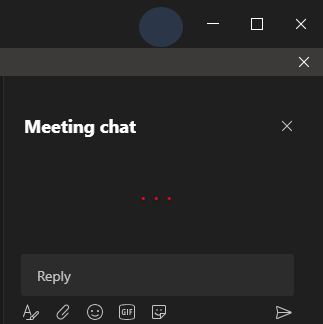 Note: See “Best Practices and Troubleshooting” section if the chat is not working for your students.
Change participant settings
Multitasking in a meeting
Watch “Move around during a Teams meeting” video (00:51 min)
Adjust your view in a Teams meeting
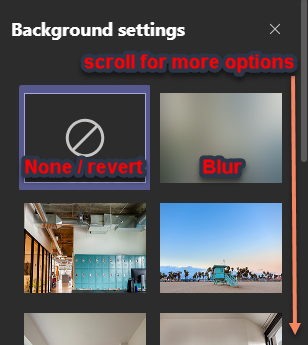
Change (or Blur) your background
If you prefer your camera on during a lecture, you have a few background effects that you can choose from.
- Click on “More actions” and select “Show background effects”

- Select one of the predefined background settings. This includes “None” to revert to normal & “Blur” as the first options
Whiteboard
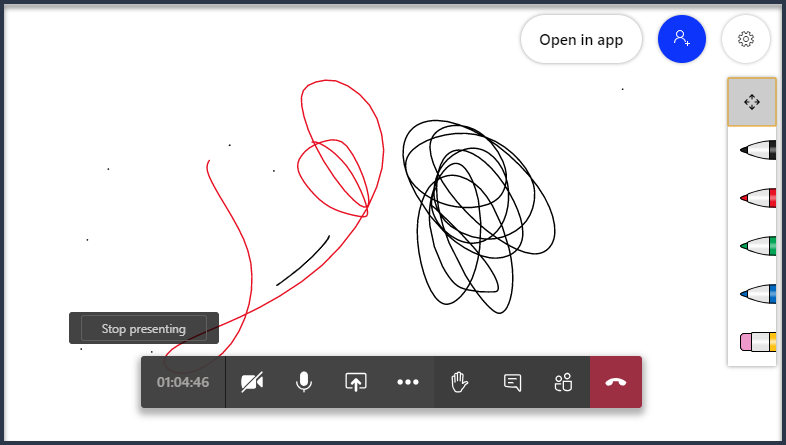
The MS Teams whiteboarding tool can be use in meetings to sketch with other participants. Only a presenter can open the whiteboard.
- To use the whiteboard in a meeting, click Share button in your meeting controls, then click Microsoft Whiteboard.
- You’ll get the choice to run the app within MS Teams or by running the Windows Store application.
 Note: The Windows Store Application has more options, such as loading images, documents and set Read only permissions to other participants.
 - You can begin sketching and sharing notes with participants.
 Note: Anyone can draw on the whiteboard unless you open the Windows Store application and manually set “Read Only” for each participants.
 - The meeting will have a whiteboard tab so you can easily reference it later.
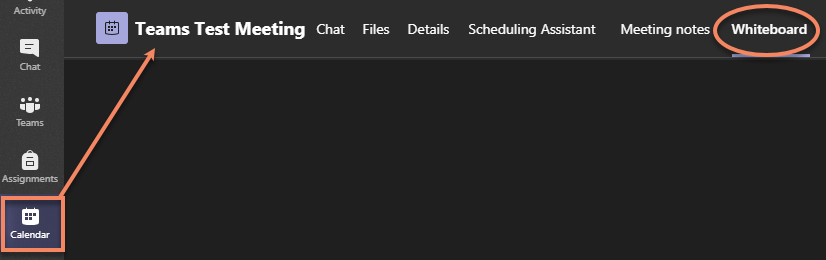
- Go to Calendar, select the calendar meeting the Whiteboard took place, you’ll notice a new Tab called “Whiteboard”
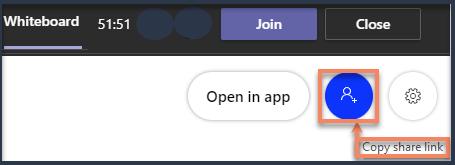
 Note: As students don’t have access to Calendar tab, they can’t access the whiteboard later without the URL.
 - You can click the Copy Share Link button to be able to share it to your students.
- A message will display to confirm it successfully copied to clipboard
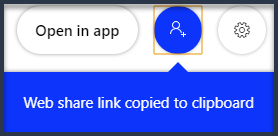
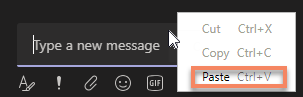
- You can now Paste (“Right-Click > Paste” or “Ctrl + V”) the link in a document, e-mail, or within the chat.
- Go to Calendar, select the calendar meeting the Whiteboard took place, you’ll notice a new Tab called “Whiteboard”
- To close the whiteboard, click the Stop Presenting button on screen.

Polls
In order to create Polls within MS Teams, an App must be set up within your Teams.
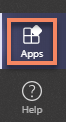
- On the left navigation bar, select “Apps”
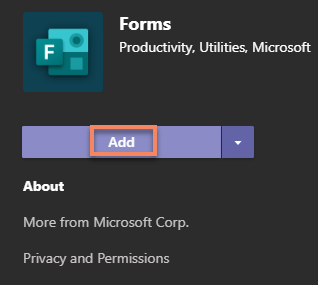
- Under All Apps locate and select the application “Forms”

- Click on the “Add” button to install Forms within MS Teams
- (Optional) Once installed, you can Add a Tab to your General Channel (or a Standard channel) for quick Access to your Forms and to create them quickly.
- Under your desired channel, select “Add a tab”

- Select “Forms” from the list
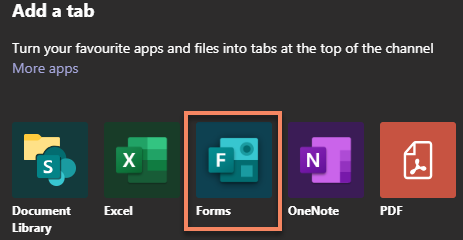 Note: Forms application not available within a Private channel
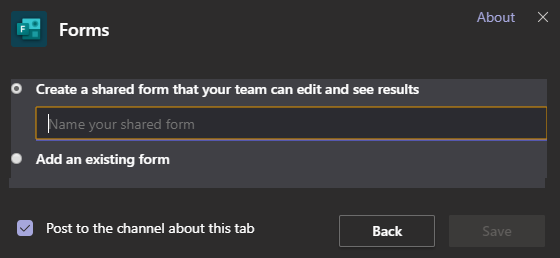
 - Enter the details desired, such a Name and if you wish to Post it to the channel.
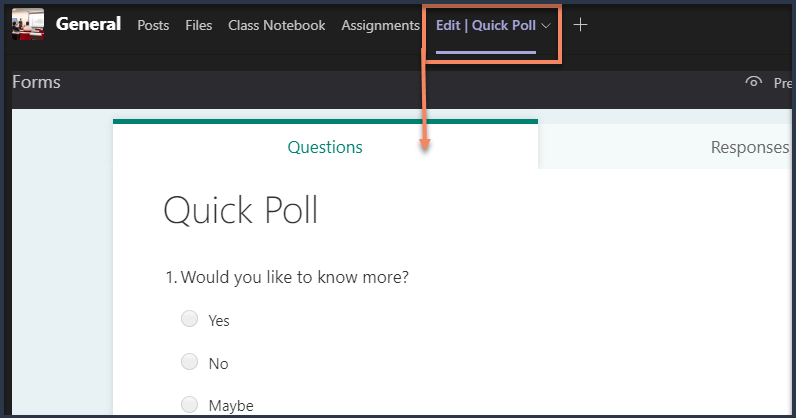
- This will create a tab at the top of your channel with the name given.

- Under your desired channel, select “Add a tab”
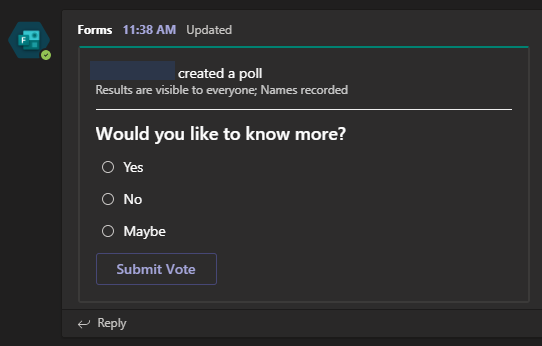
- Select Forms from the Chat window, or from your Quick Poll tab and enter the Question.
- Forms via chat window

- Quick Poll tab:
- Forms via chat window
- This allows your students to answer you poll and review the responses.
- Forms within chat window: Directly within the channel chat if created via the Chat Form button.
- Quick Poll tab: Accessible within the Tab of a channel if created in a tab
- Forms within chat window: Directly within the channel chat if created via the Chat Form button.
Keyboard shortcuts for Teams meetings
During a meeting, moving your cursor on the screen will bring up the meeting controls toolbar.
Some of the most used options will be explained in detail below.
Meeting control toolbar:
More Actions:
Manage audio settings
- Click on More actions ••• and select Show Device Settings
- Check and change your Device Settings by desired Audio Device, speaker, microphone and camera.
Note: If your device is not found, best practice is to reconnect your device and see if it appears.
Share your screen
It is recommended to ask your professor before sharing your screen.
If the option is not available, your professor may have turned this function off.
- To share your screen in a meeting, select Share in your meeting controls.
- Then, choose to present your entire desktop or a specific window or application
Note: If you are using MS Teams on the web, certain functions will not work. Please download the application for full functionalities. - (Optional) Share system audio
- To share your system audio, select Share in your meeting controls and then Include system audio.Note: All system audio, including notifications, will be included in the meeting.
- To share your system audio, select Share
- When you are done sharing, go to your meeting controls and select Stop sharing button.
- Watch the “Show your Screen during a meeting” video (00:47 min)
Chat with Professor or other students
- Click on Show Conversation to bring up the chat interface.
- The Chat pullout menu will appear on the right-hand side of the screen.
Note: See Best Practices and Troubleshooting section if the chat is not working for you.
Multitasking in a meeting
Watch the “Move around during a Teams meeting” video (00:51 min)
Adjust your view in a Teams meeting
Change (or Blur) your background
If you prefer your camera on during a lecture, you have a few background effects that you can choose from.
- Click on More actions ••• and select Show background effects.
- Select one of the predefined background settings. This includes None/revert to revert to normal & Blur as the first options
Only a presenter can open the whiteboard app. They can choose to set it to Read Only (option only accessible via the app).
Note: It’s important to be respectful and not write on the whiteboard unless you ask the Professor permission before doing so.
Keyboard shortcuts for Teams meetings
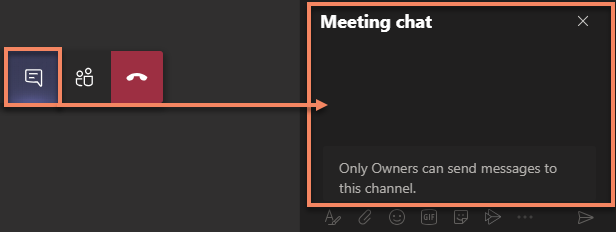
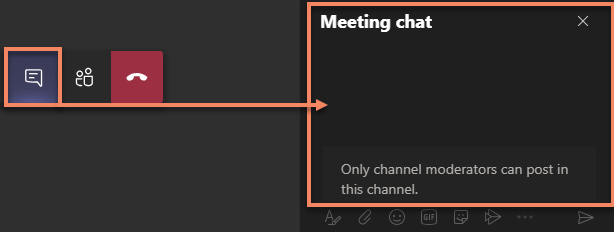
The only way to disable the chat interface from members is to change the settings of a channel so only Members can type messages. You can then set up a meeting by inviting that channels members.
By changing the settings of your channel, it is possible to prevent students from posting and chatting during a meeting.
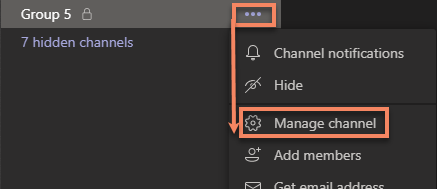
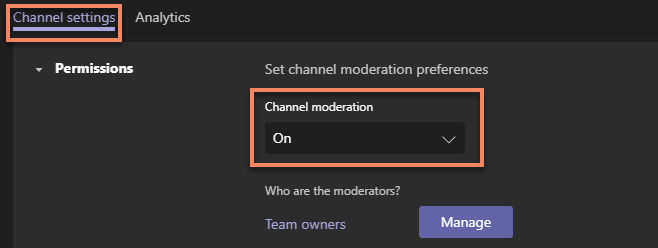
- Navigating to that channel’s More options ••• › Manage channel
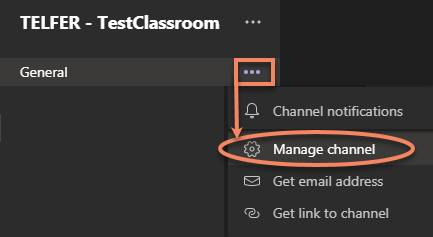
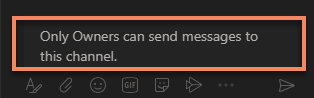
- Under “Channel settings” set the channel moderation preferences to “Only owners can post messages”
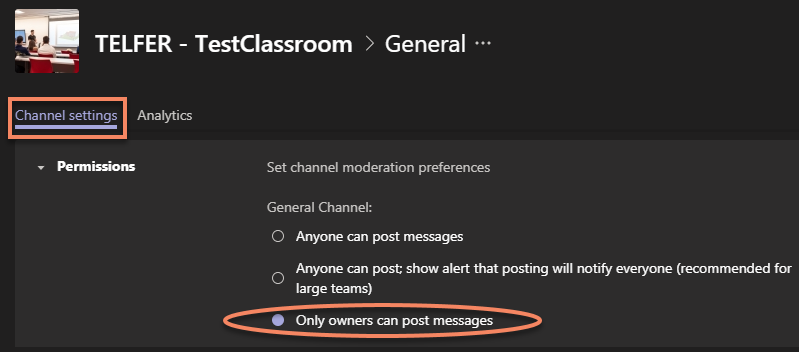
- This will stop members from posting within the channel. Owners (such as yourself, or your TA) will still be able to post within.
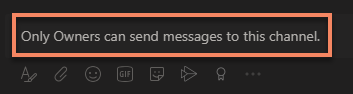
- This will also stop members from chatting when creating a meeting by inviting this specific channel
- (Optional) If you do not wish to disable posting in the "General" channel, you can create another Standard channel and specify Posting is disabled:
- Create a new “Standard Channel”. Give it a name and description. See “Create a Channel” for more details.
 Note: Do not create a Private Channel for this. It is not possible to send a meeting invite to a Private Channel.
 - The “Channel settings” will be slightly with a Standard channel. Set Channel moderation to “On”
- Remove the check in “Allow members to reply to channel messages”
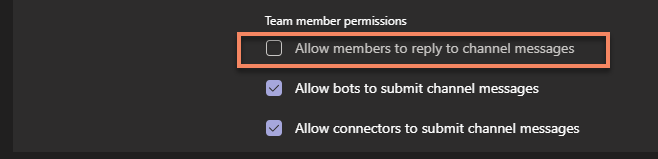
- They will be unable to post within the channel (unless promoted to a channel moderator or already an owner)

- They will be unable to chat during a meeting (specifically if invited via this channel)
- Create a new “Standard Channel”. Give it a name and description. See “Create a Channel” for more details.
- (Optional) If you do not wish to disable posting in the "General" channel, you can create another Standard channel and specify Posting is disabled:
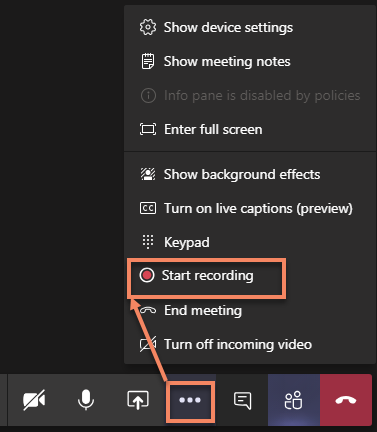
Record a meeting
You can promote a user (such as a Teaching Assistant) to a presenter to have them record the meeting on your behalf.
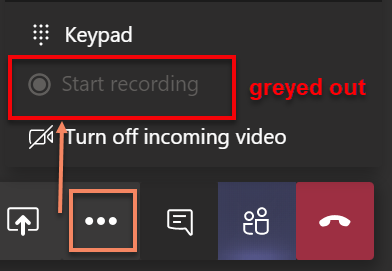
- To start a recording, go to the meeting controls and select More options ••• › Start recording.
- The first time you try to record a meeting, you will need to View and Accept the uOttawa Policy on audio and video recording.
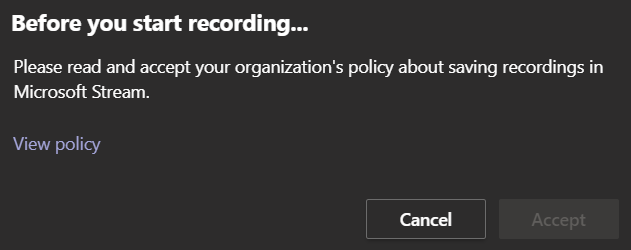 Note: View Policy will redirect you to the uOttawa Best Practices on Audio and Videoconferencing recording.
 - A message will be displayed at the top of MS Teams to advise you.
 Note: Link to “Privacy policy” concerning the recording of meetings.
 - To stop a recording, go to the meeting controls and select More options ••• › Stop recording
- A confirmation to stop recording will display. Click Stop recording to confirm.
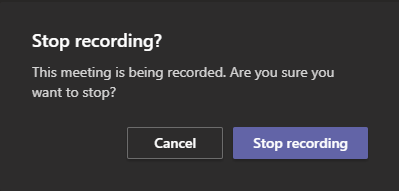 Note: A recording cannot be paused. Once Stopped, it can’t be resumed. A new recording will need to be started.
 - Once the recording has stopped, a message will be displayed it is being saved at the top of the window and within the chat.

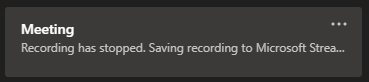 Note: This could take some time depending on the size of the file.
 - Once completed, the recording will appear in the Chat that the meeting took place (normally General).
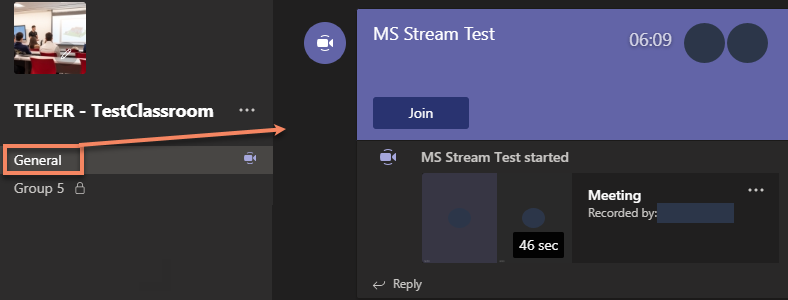
Play and share a meeting recording
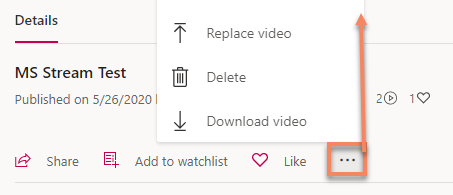
Of the recording you’ve created, click on the More options ••• button next to the recording to access the options available.
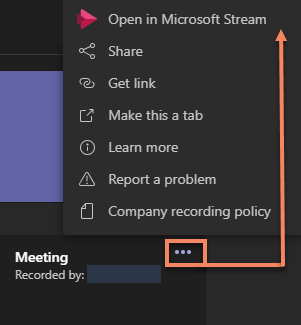
- Select Open in Microsot Stream to view the recording.
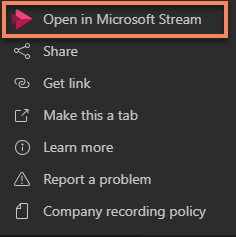 Note: Login with your uoAccess credentials.
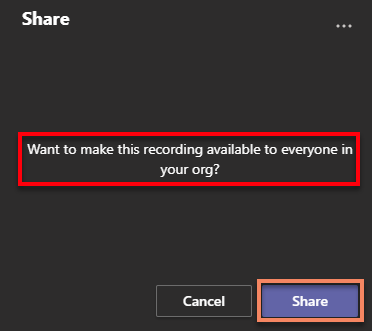
 - The Share button allows you to share it within uOttawa.
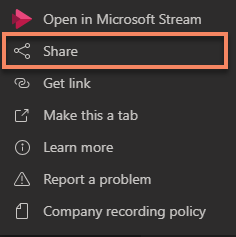
- Click the Share to confirm sharing the video to everyone.
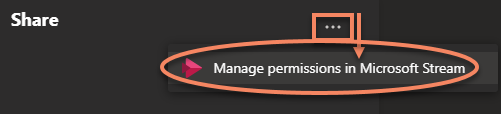
- (Optional) You can select the More Options ••• button at the top to manage the permissions of the video in MS Stream.
- Click the Share to confirm sharing the video to everyone.
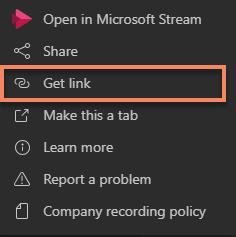
- The Get Link option allows you to quickly Copy the link in order to paste it at desired location (ex: Brightspace).
- Click the Copy button to automatically grab the entire Stream link.
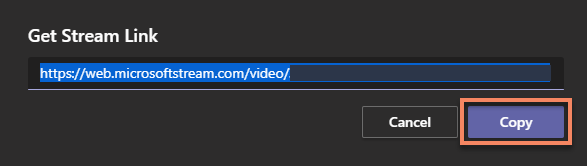
- Users will still need to sign in a Microsoft Stream account to access the recording
 Note: Only uoAccess credentials can view the recording directly from Microsoft Stream
- Click the Copy button to automatically grab the entire Stream link.
Download a recording
A video recorded can only be downloaded from the author, or an authorized user, within Microsoft Stream.
- Log into Microsoft Stream and view your recording or select a recording’ More options ••• › Open in Microsoft Stream.
 Note: Login with your uoAccess credentials.
 - Click the More options ••• button and select Download video.
 Note: Once you click download, the file will automatically save as an mp4 with your selected browser.
Delete a Recorded meeting
A video recorded can only be deleted from the author, or an authorized user, within Microsoft Stream.
- Log into Microsoft Stream and view your recording or select a recording’ More options ••• › Open in Microsoft Stream.Note: Login with your uoAccess credentials.
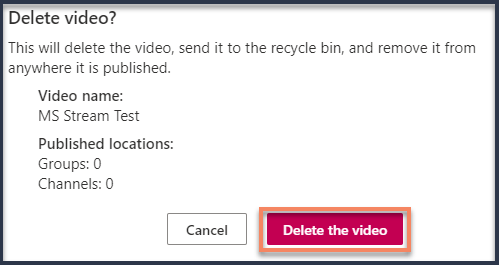
- Click the More options ••• › button and select Delete.
- Confirm the deletion to remove the video from MS Stream
Where to save a meeting
Microsoft Stream:
Meeting recordings are automatically saved within Microsoft Stream.
- Only authorized users will have access to your recording.
- Only valid accounts at uOttawa will be able to login to view them.
MS Teams:
While it is possible to download the recording directly from Microsoft Stream, download the recording, and upload to your Teams Classroom, there are storage limitations:
https://docs.microsoft.com/en-us/microsoftteams/limits-specifications-teams#storage
Brightspace:
It is not recommended to upload videos to Brightspace due to the streaming quality and the maximum file size limit of 1gb.
Recording a meeting
Professors can promote a user (such as a Teaching Assistant) to a presenter to have them record the meeting on their behalf.
If your professor choses to record the class meeting:
- A message will be displayed at the top of MS Teams to advise you.Note: Link to Privacy policy concerning the recording of meetings.
- Once the recording has stopped, a message will be displayed it is being saved at the top of the window and within the chat.Note: This could take some time depending on the size of the file.
- Once completed, the recording will appear in the Chat that the meeting took place (normally General).
Play and share a meeting recording
When a recording finishes, students will not have access to the recording until the author gives access.
Please contact your Professor or Teaching Assistant to request access.
- From the recording available in chat, click on the More options ••• button next to the recording to access the options available.
- Select Open in Microsoft Stream to view the recording.Note: Login with your uoAccess credentials.
- The Share button is only available to the author, or an authorized user, within Microsoft Stream
- The Get Link option allows you to quickly Copy the link.
- Click the Copy button to automatically grab the entire Stream link.
- Users will still need to sign in a Microsoft Stream account to access the recordingNote: Only uoAccess credentials can view the recording directly from Microsoft Stream
- Click the Copy button to automatically grab the entire Stream link.
Download a recording
A video recorded can only be downloaded from the author, or an authorized user, within Microsoft Stream.
Please contact your Professor or Teaching Assistant to request access.
- Log into Microsoft Stream and view your recording or select a recording’ More options ••• › Open in Microsoft Stream.Note: Login with your uoAccess credentials.
- Click the More options ••• button and select Download video.Note: Once you click download, the file will automatically save as an mp4 with your selected browser.
Delete a Recorded meeting
A video recorded can only be deleted from the author, or an authorized user, within Microsoft Stream.
Best Practices and Troubleshooting
Keep your Team meeting information private
Teams meeting join links and audioconferencing dial-in information should not be shared on social media or made publicly available. Meeting join links should be sent directly to specific participants or published in a secured area or within your Microsoft Team.
Access Controls
You can hold participants in a meeting lobby to control the admittance of external or anonymous participants by setting up Who can bypass the lobby? in your meeting options.
To handle this for larger meetings, you may want to appoint a trusted user to a presenter role to facilitate participant access to the meeting.
Prevent users from taking control of a meeting
Prevent users from taking control of the meeting by limiting the presenter role to the organizer and/or assigning the presenter role to specific people prior to the meeting.
Limit screen sharing
You can limit the screen sharing options by assigning the presenter role to the organizer and/or specific people to remove the possibility of participants from taking over the meeting and sharing unwanted content.
Restrict chat
While there is no ability to disable chat in a Teams meeting, you can limit access to chat by changing the settings of a channel. If you create a meeting and invite the Channel (such as instructed in the Meetings > Turn Chat On or Off) members will not be able to chat. See Section “Chat and Guest Access” for more information as well as How to set your channel permissions to limit chat to owners.
In the meeting controls toolbar, check to see if you are muted.
Muted

Unmuted

If you encounter difficulties with your audio or microphone, reconnect the device on your computer and see if it appears under Show Device Settings.
See Manage audio settings for more details
- Position the camera as close to eye level as possible. For best picture quality, do not have a bright light source or window as your background.
- If possible, use a wired internet connection. If you use a wireless connection, ensure you are close to your router to maximize signal strength.
- If you experience freezing video or audio dropouts during a call, there are a few settings that you can change that could improve your conference performance:
Turning your camera off:
- Bring up the meeting controls toolbar by moving your mouse over the screen.
- Click on the camera icon to turn it off.
Camera On
Camera Off

Turning off all incoming video:
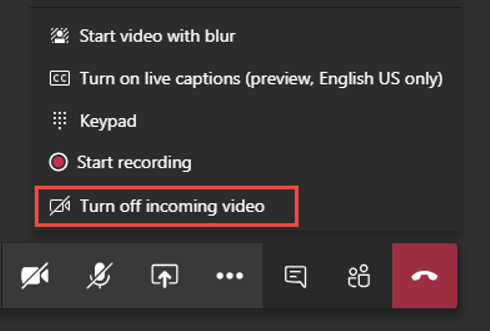
- Bring up the meeting controls toolbar, click on More actions •••.
- Select Turn off incoming video.
- Select the window you wish to share.
Note: Window Share is not recommended for PowerPoint as it has its own share button. See section What to do during a meeting > Share your screen for more details. - After you share a window, Select Microsoft Teams application from your Taskbar.

- Maximize the MS Teams window at the top right corner.

- Return to your shared Windows by selecting it from your Taskbar

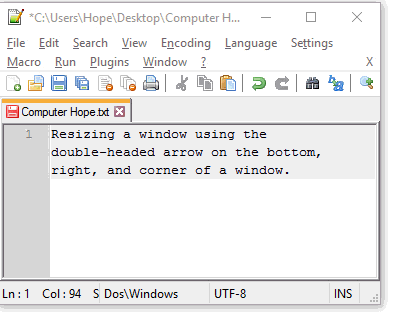
- it’s now possible for you to stretch your selected Window, by placing your cursor on the edges, and overlap the MS Teams application in order to still see the Chat.

Note: See How to Resize a Window for more details. - Conversations of your Teams meeting is now visible. The Window is simply placed over MS Teams application and resized to the desired length.
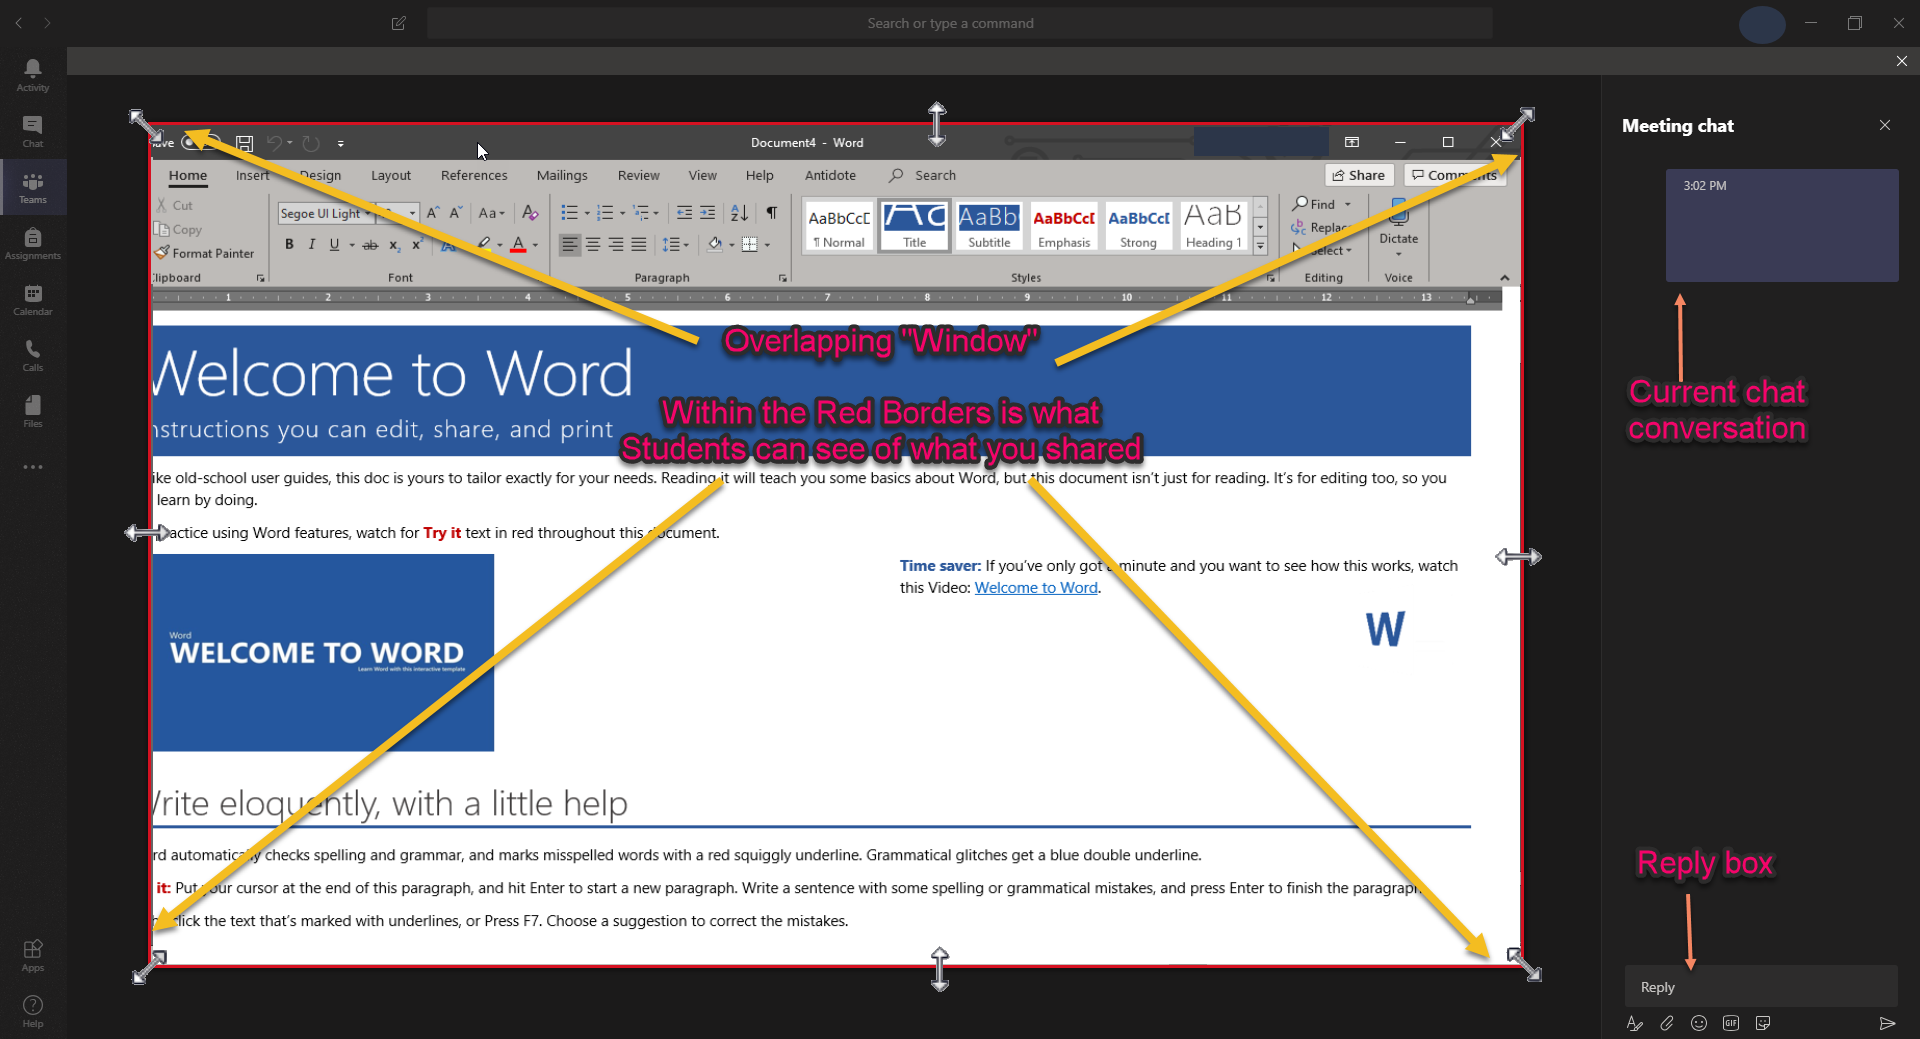
Note: You'll notice a Red border around your document. This indicates that MS Teams is only sharing this portion to others.
Students will ONLY see the shared window, even if you switch your view to another window.
- The “Show conversation” allows students and professors to chat during the meeting. It is also a way for professors to leave quick notes, files or links during the class.
- If your students are informing you of difficulties with the chat:
- You may have turned off Chat.
- If you have disabled chat, students will be able to bring up the Show Conversation interface and few what you type, but they will be unable to respond in chat or chat amongst themselves.
Note: To change this setting, see “Meetings > How to turn chat On or Off”
- If you have disabled chat, students will be able to bring up the Show Conversation interface and few what you type, but they will be unable to respond in chat or chat amongst themselves.
- You may have turned off Chat.
- Your students may have entered the Meeting as a Guest.
- If your students have copied the link from an e-mail and are being asked to enter a display name, this is called joining as a guest.
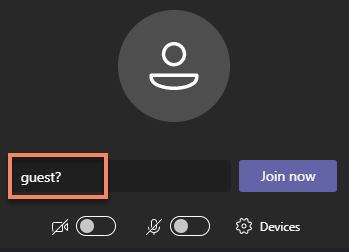
- Meeting options > Who can bypass the lobby? are set by default to People in my organization.

- You will be able to easily see who has joined in as a Guest. A pop up will come up letting you know they are in the Lobby and waiting for you to let them in.
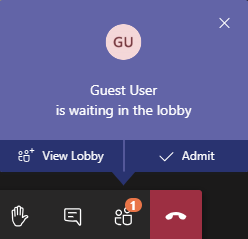
- Guests have limited functionalities. You will not be able to bring up the Show Conversations nor chat with other students or the professor.
Note: To avoid entering a meeting as a guest, see How to Get Started with Microsoft Teams.
- If your students have copied the link from an e-mail and are being asked to enter a display name, this is called joining as a guest.
- The Show conversation allows students and professors to chat during the meeting. It is also a way for professors to leave quick notes, files or links during the class.
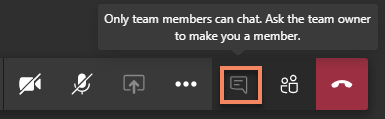
- If the Show Conversation function is not working:
- Your professor may have turned off Chat.
- If the Professor has disabled chat, you’ll be able to bring up the Show Conversation interface but will be unable to chat.
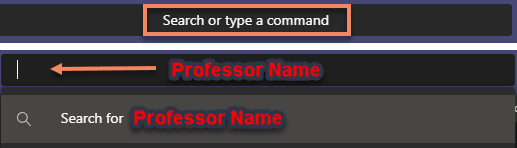
- Contact your professor to discuss about the possibility of reactivating the Meeting chat functions. You can send a private message to your professor by using the Search or type a command at the top of MS Teams.
Note: While Chat is useful in a bind, your professor may request not to communicate via Chat.
It is encouraged you use their preferred method of communication. (Ex: e-mail / Brightspace / Other)
- If the Professor has disabled chat, you’ll be able to bring up the Show Conversation interface but will be unable to chat.
- Your professor may have turned off Chat.
- You may have entered the Meeting as a Guest.
- If you have copied the link from an e-mail and are being asked to enter a display name, this is called joining as a guest.
- Guests have limited functionalities. You will not be able to bring up the Show Conversations nor chat with other students or the professor.
Note: To avoid entering a meeting as a guest, see How to Get Started with Microsoft Teams.
- If you have copied the link from an e-mail and are being asked to enter a display name, this is called joining as a guest.
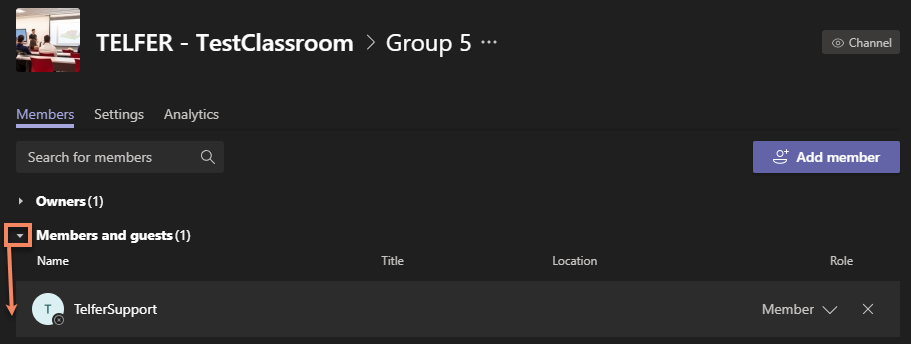
In order to be removed from a Teams Classroom, communicate with one of the owners in order to be removed.
- On the left navigation bar, select Teams.
- Go to the Class team you want to be removed from and choose More options ••• › Manage team.
- Under Members, locate the owners. Owners will generally be your professor (or possibly teaching Assistant).
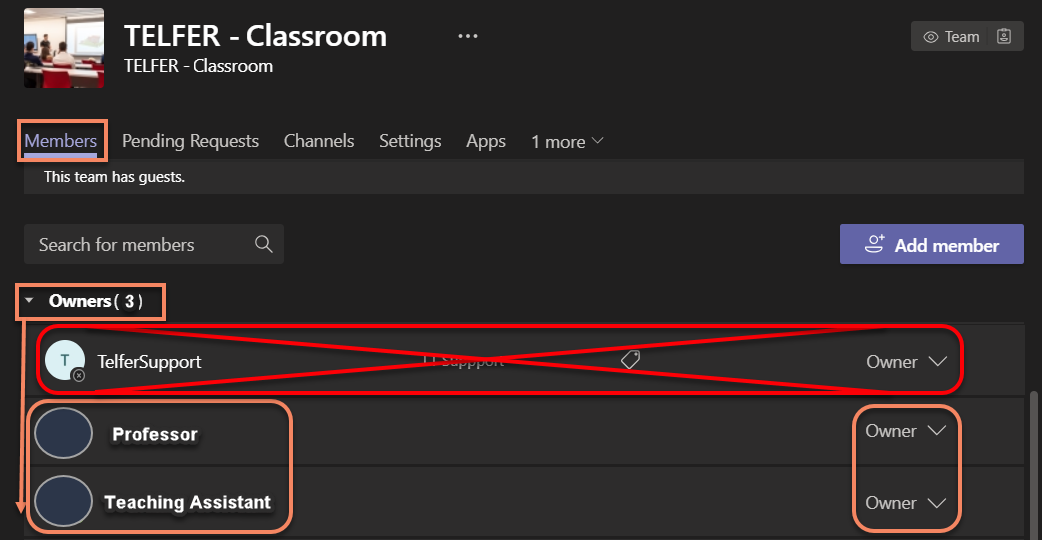
Note: Never contact owner TelferSupport in order to be removed. This account is not monitored.
Important Notes
- Students accounts are considered members if they log in using their UOAccess ID. A member account can be set as an Owner. This is useful for inviting a TA to present, host and assist in a Team Class environment. More details available on Roles of Owners and Members.
- All External Accounts are considered guests and cannot be elevated to Members or Owners. More details available on Guest Access.
- Due to current Web client browser limitation, and the complexity of troubleshooting various browsers and versions, Telfer IT recommends and will only offer supports for the desktop clients. If students or users wish to use the Web Client, more information on the web limitations is available on the Microsoft Teams website.
- The features within MS Teams Assignments website have not been fully tested and it’s possible that some functions have not been enabled by uOttawa Central IT department. The main supported software for Class assignments is the Brightspace Platform.
Support for Brightspace is available via the web or by contacting our Instructional Designer Abdul H. Kane or reaching out to Brightspace Technical Support number at 1-866-811-3201. - While there are many other web conferencing software available on the internet, the University of Ottawa (uOttawa) currently only offers supports with Adobe Connect and Microsoft Teams.
- Teams meetings are currently limited to 250 participants in a single meeting session.
- uOttawa Central IT-TI will eventually set in place a Teams Classrooms Retention Policy of ~6 months.
- It is not possible for an owner to export MS Teams chat history. In order to get this information, you would need to submit a request via the uOttawa Helpline online request form.
Other Useful Links:
- uOttawa Professor Zone
- Creating, attending, and running meetings while using Teams for distance learning
- Microsoft Teams for Education
- Microsoft Teams Video Training
- Brightspace Help website
Support inquiries and Password resets
All inquiries for assistance with setting up your class with MS Teams should be directed to our Instructional Designer Abdul H. Kane.
All technical difficulties with MS Teams can be directed to Telfer IT Support by submitting a request for assistance via our Web Form.
- For urgent requests, fill in the form and contact us at 613-562-5800 x4696 with the ticket number at the ready.
All uoAccess password resets, should be directed to the University of Ottawa’s Helpline:
- Phone: 613-562-5800 x 6555
- Online request: https://it.uottawa.ca/request
- Students’ accounts are considered members in MS Teams if they log in using their uoAccess credentials. A member account can be set as an owner. This is useful for inviting a TA to present, host and assist in a Team Class environment. They will not be able to create a Calendar event with their student ID. More details available on Roles of Owners and Members.
- Due to current Web client browser limitations, and the complexity of troubleshooting various browsers and versions, Telfer IT recommends and will only offer supports for the desktop clients. If students or users wish to use the Web Client, more information on the web limitations is available on the Microsoft Teams website.
- While there are many other web conferencing software available on the internet, the University of Ottawa (uOttawa) currently only offers supports with Adobe Connect and Microsoft Teams.
- Team meetings are currently limited to 250 participants in a single meeting session.
Other Useful Links:
- uOttawa Information Technology - Student Zone
- Microsoft Teams for Education
- Microsoft Teams Video Training
- Microsoft Quick Start Guide
- Microsoft Interactive Teams Demo
- Manage your uoAccess account and password
Support inquiries and Password resets
All student inquiries for assistance with MS Teams, including uoAccess Password resets, should be directed to the University of Ottawa’s Helpline:
Note: Only your professor can add you to a Team Classroom. Contact your professor if you can log into MS Teams but are unable to see your class.
- Phone: 613-562-5800 x6555
- Online request: https://it.uottawa.ca/request
